Mental model: Docker packages the environment (config and dependencies) with the code, so "run" becomes a predictable, repeatable operation irrespective of the device and OS.
Mini command cheat sheet (the 20% you’ll use 80% of the time)
# Images# List local imagesdocker images# Pull an image from a Docker Hubdocker pull nginx:1.23# Containers# To list currently running containersdocker ps# List all docker containers (running and stopped)docker ps -a# Run a container in the background (-d) from an image:tag (nginx:1.23) with custom name (mynginx) and publish a container's port(s) to the host (<host_port>:<container_port>).docker run -d --name mynginx -p 9000:80 nginx:1.23# Fetch and follow the logs of a containerdocker logs -f mynginx# Start or stop an existing container: (<container_name> or <container-id>)docker stop mynginxdocker start mynginx# Build your own image (myapp:1.0) from Dockerfile# -t myapp:1.0 assigns the name myapp with tag 1.0 to the resulting image# Without -t, Docker still builds the image but gives it no name — you'd have to reference it by its SHA hash (e.g., sha256:a3d2f...), which is impracticaldocker build -t myapp:1.0 .docker run -d -p 3000:3000 myapp:1.0# Tags# Tag an existing image with a new name (both point to the same SHA digest)docker tag myapp:1.0 myapp:latest# Build with multiple tags at oncedocker build -t myapp:1.0 -t myapp:latest .# Debugging / Inspection# Override CMD — drop into a shell instead of starting the app (replaces CMD entirely)docker run -it myapp:1.0 sh# Spawn a shell inside an already-running container (app keeps running)docker exec -it mynginx sh# Check what's inside the image filesystemdocker run --rm myapp:1.0 ls -la /app/# Cleanup# Remove a stopped containerdocker rm mynginx# Delete an image (untags then deletes layers if no other tags reference them)docker rmi myapp:1.0
Docker (First Principles + Hands-on)
This note is a cohesive “why → how → do it” walkthrough, based on the crash course I watched (YouTube video), and the hands-on custom docker image project (prasanth-ntu/docker-demo).
Why Docker exists (What problem does it solve)?
Software doesn’t “run” from source code alone. It runs from code + runtime + OS libraries + configuration + dependent services (Postgres/Redis/etc).
“Works on my machine” happens when those hidden assumptions differ across laptops and servers (versions, configs, OS differences).
Docker’s core move is simple:
Instead of shipping code + instructions, ship code + environment.
Before containers: deployment relied on textual guides from Dev → Ops.
WARNING
❌ Human errors can happen
❌ Back and forth communication
After containers: everything is packaged inside the Docker artifact (app source code + dependencies + configuration).
SUMMARY
✅ No configurations needed on the server
✅ Install the Docker runtime on the server (one-time effort)
✅ Run Docker command to fetch and run the docker artifacts
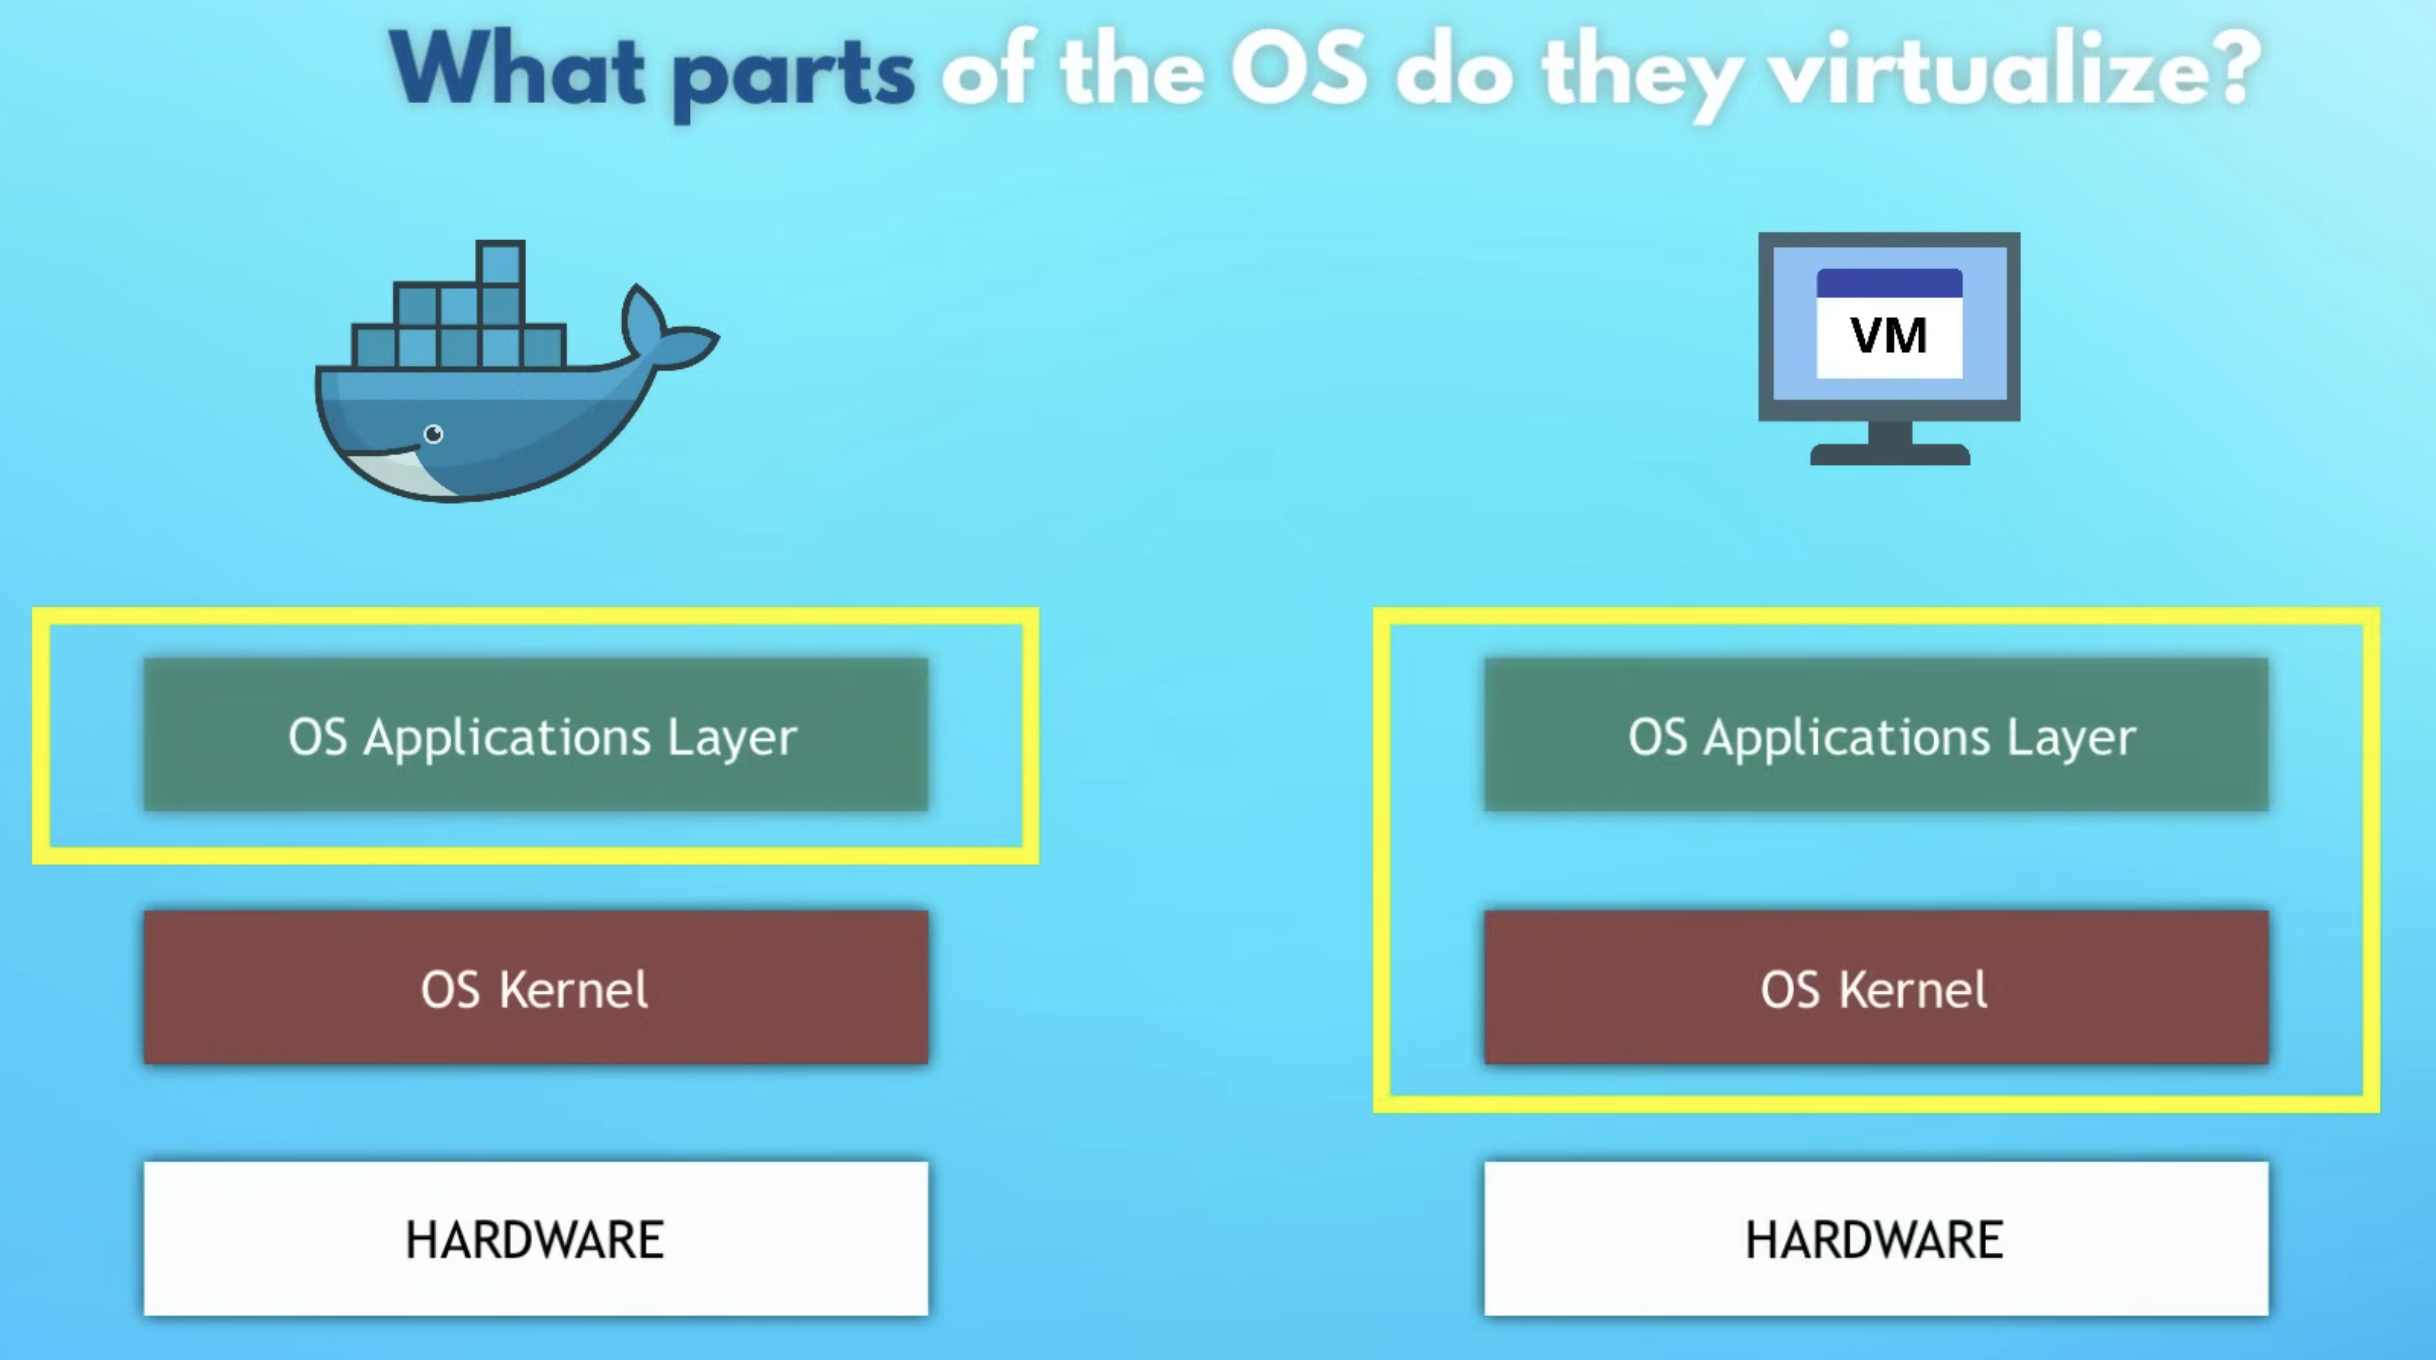
What Docker really virtualizes (VMs vs containers)
First principles: an OS has two “layers”:
Kernel: talks to hardware (CPU, memory, disk).
User space: programs + libraries that run on top of the kernel.
Docker vs VMs differs mainly in what gets virtualized: the whole OS, or just the application user space.
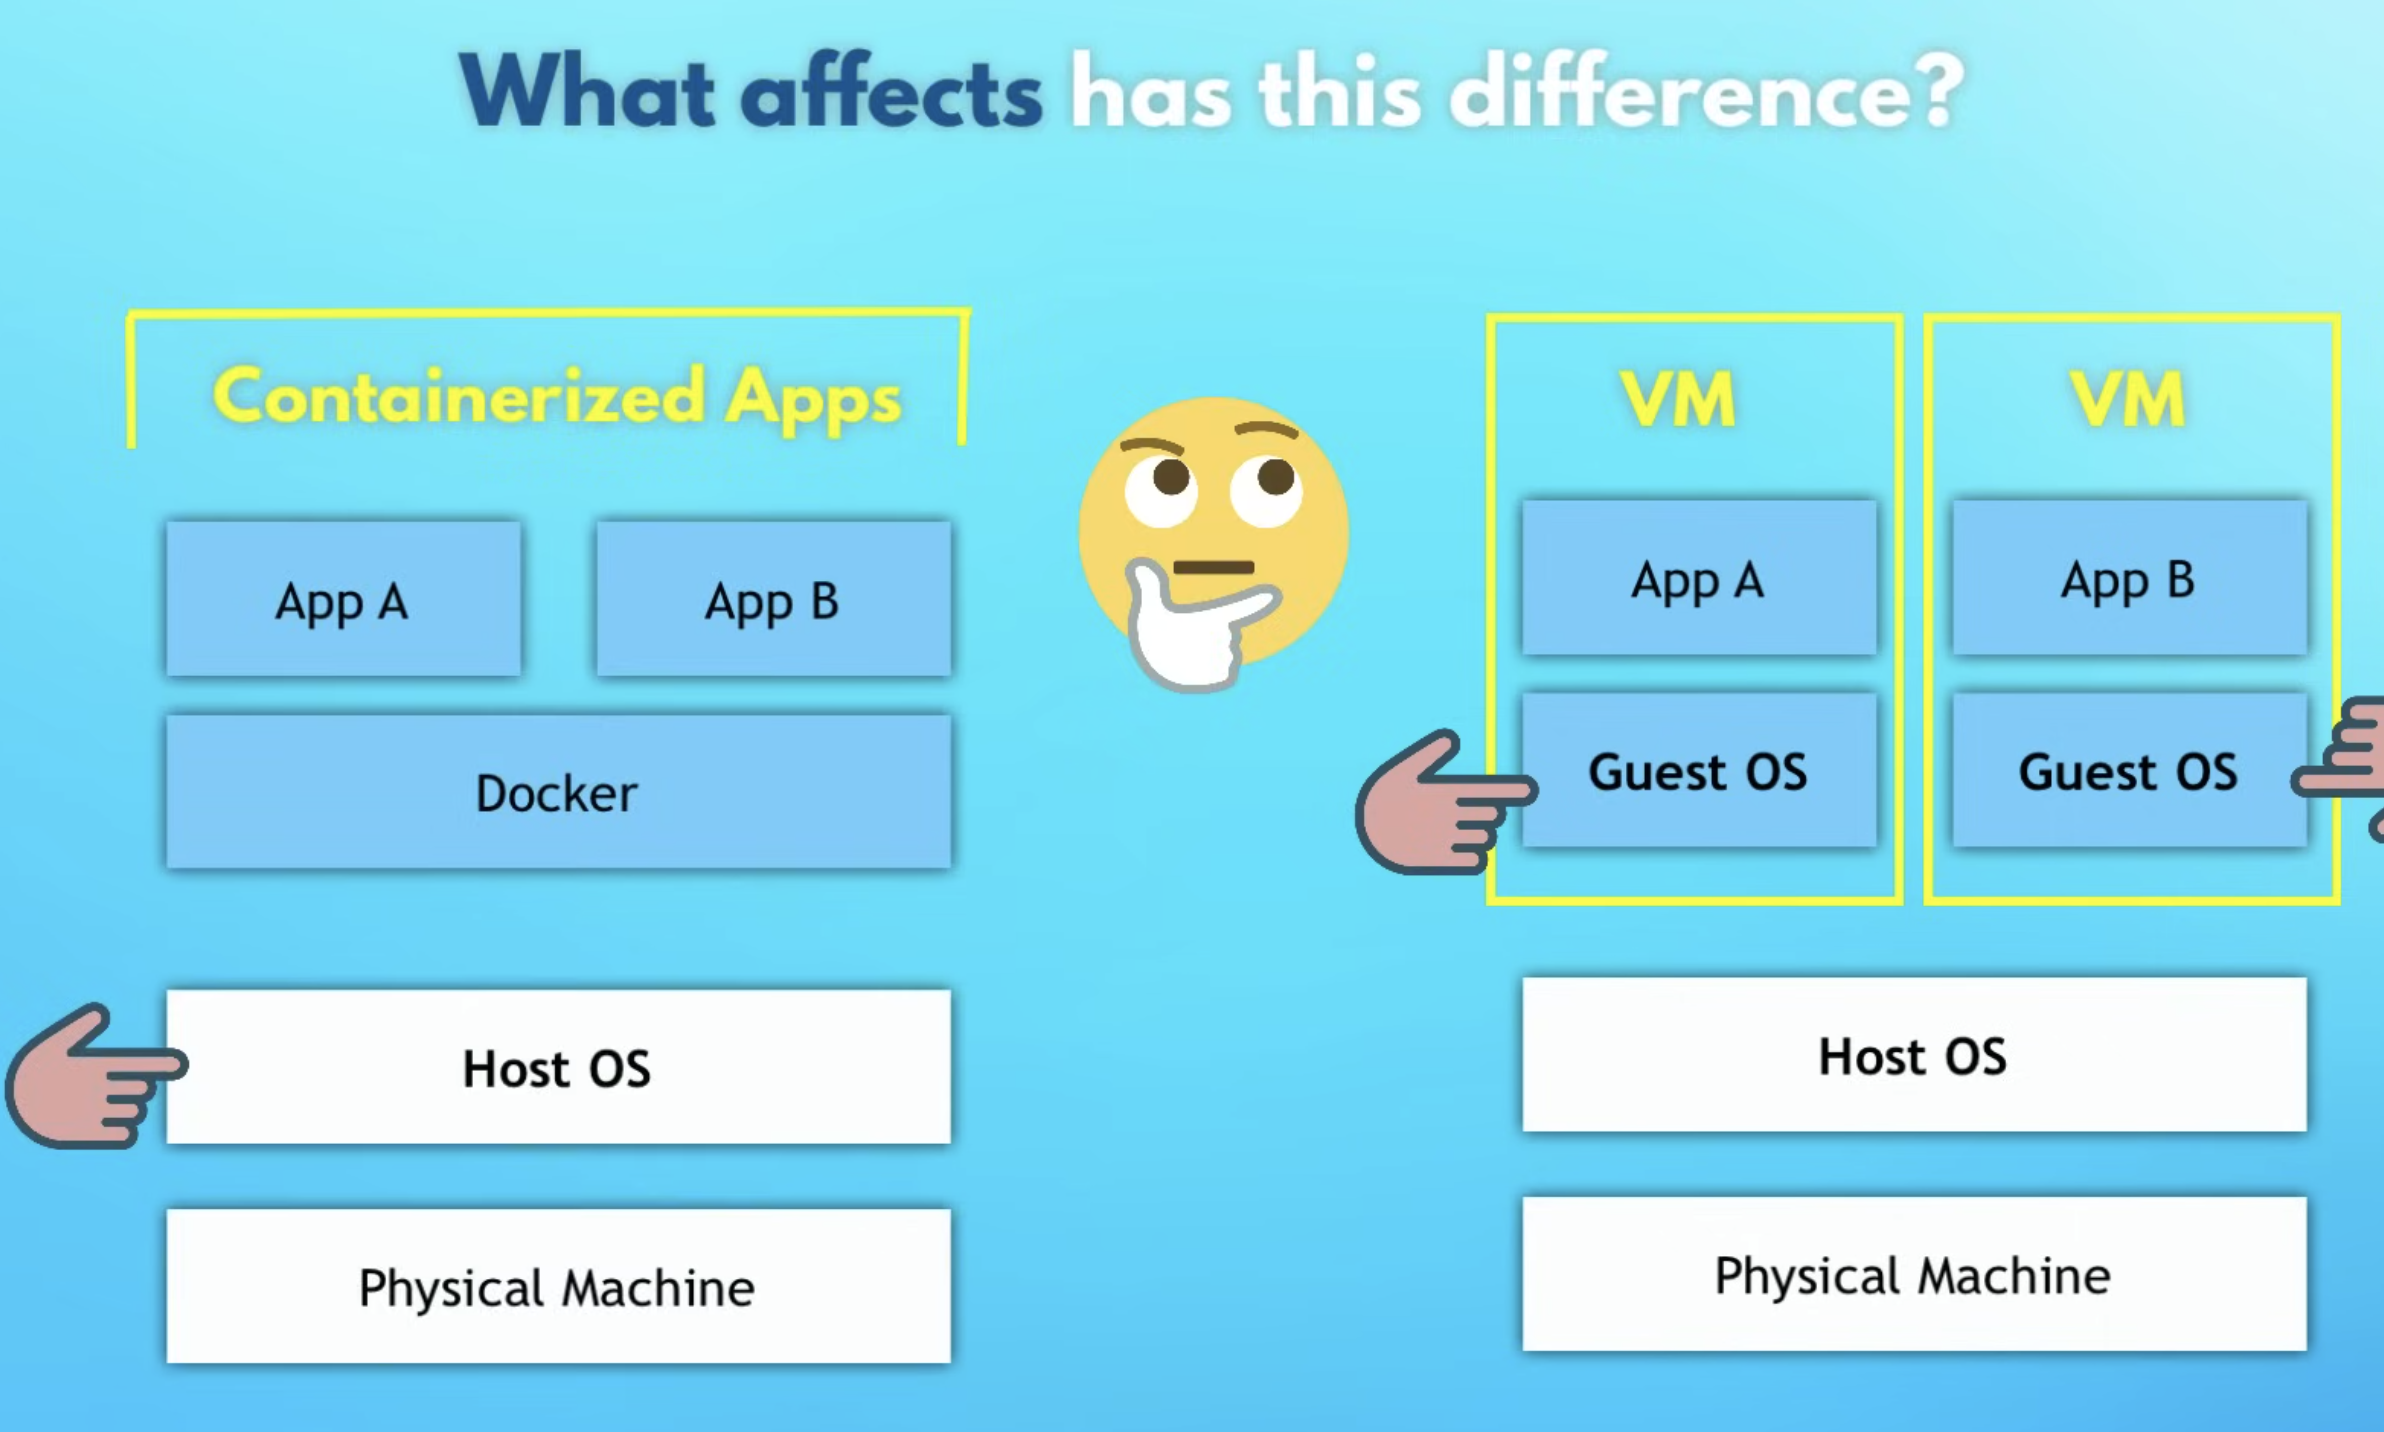
Virtual Machines (VMs)
Virtualize kernel + user space (a whole OS)
Heavier (GBs), slower start (often minutes)
Strong isolation; can run different OS kernels (Linux VM on Windows host, etc.)
Docker containers
Virtualize user space (process + filesystem + libs)
Reuse the host kernel
Lighter (MBs), faster start (often seconds or less)
On macOS/Windows, Docker Desktop runs a lightweight Linux VM under the hood so Linux containers can still run — that's why it "just works" locally.
Analogy: If venv organizes the bookshelf (Python libraries), Docker builds the entire apartment (OS tools, system libraries, and settings).
The 4 core nouns: Image, Container, Registry, Repository
1) Image = the package
An image is the immutable artifact you build or download: app code + runtime + OS user-space bits + config.
2) Container = a running instance
A container is a running (or stopped) instance of an image — like “a process with a filesystem snapshot”.
Analogy:
Image: blueprint / recipe / “frozen meal”
Container: built house / cooked dish / “hot meal”
3) Registry = the image warehouse
A registry is a service that stores images and lets you pull/push them.
Public registry: Docker Hub is the default public registry most people start with.
Private registry: companies store internal images in private registries (cloud provider registries, self-hosted, or private Docker Hub repos).
Registries exist because images are large and versioned, and need standardized distribution (pull/push), caching, and access control across laptops, CI, and servers.
4) Repository = a folder inside a registry
A repository is a named collection of related images (usually one app/service).
Think:
Registry: the warehouse
Repository: a shelf (one product line)
Tags: labels on boxes (versions)
Tags and versioning (why latest is usually a trap)
Images are referred to as:
name:tag
Examples:
nginx:1.23
node:20-alpine
What latest actually means
latest is just a tag — not “the newest stable thing” by magical guarantee.
Best practice: pin explicit tags (or digests) in production and CI.
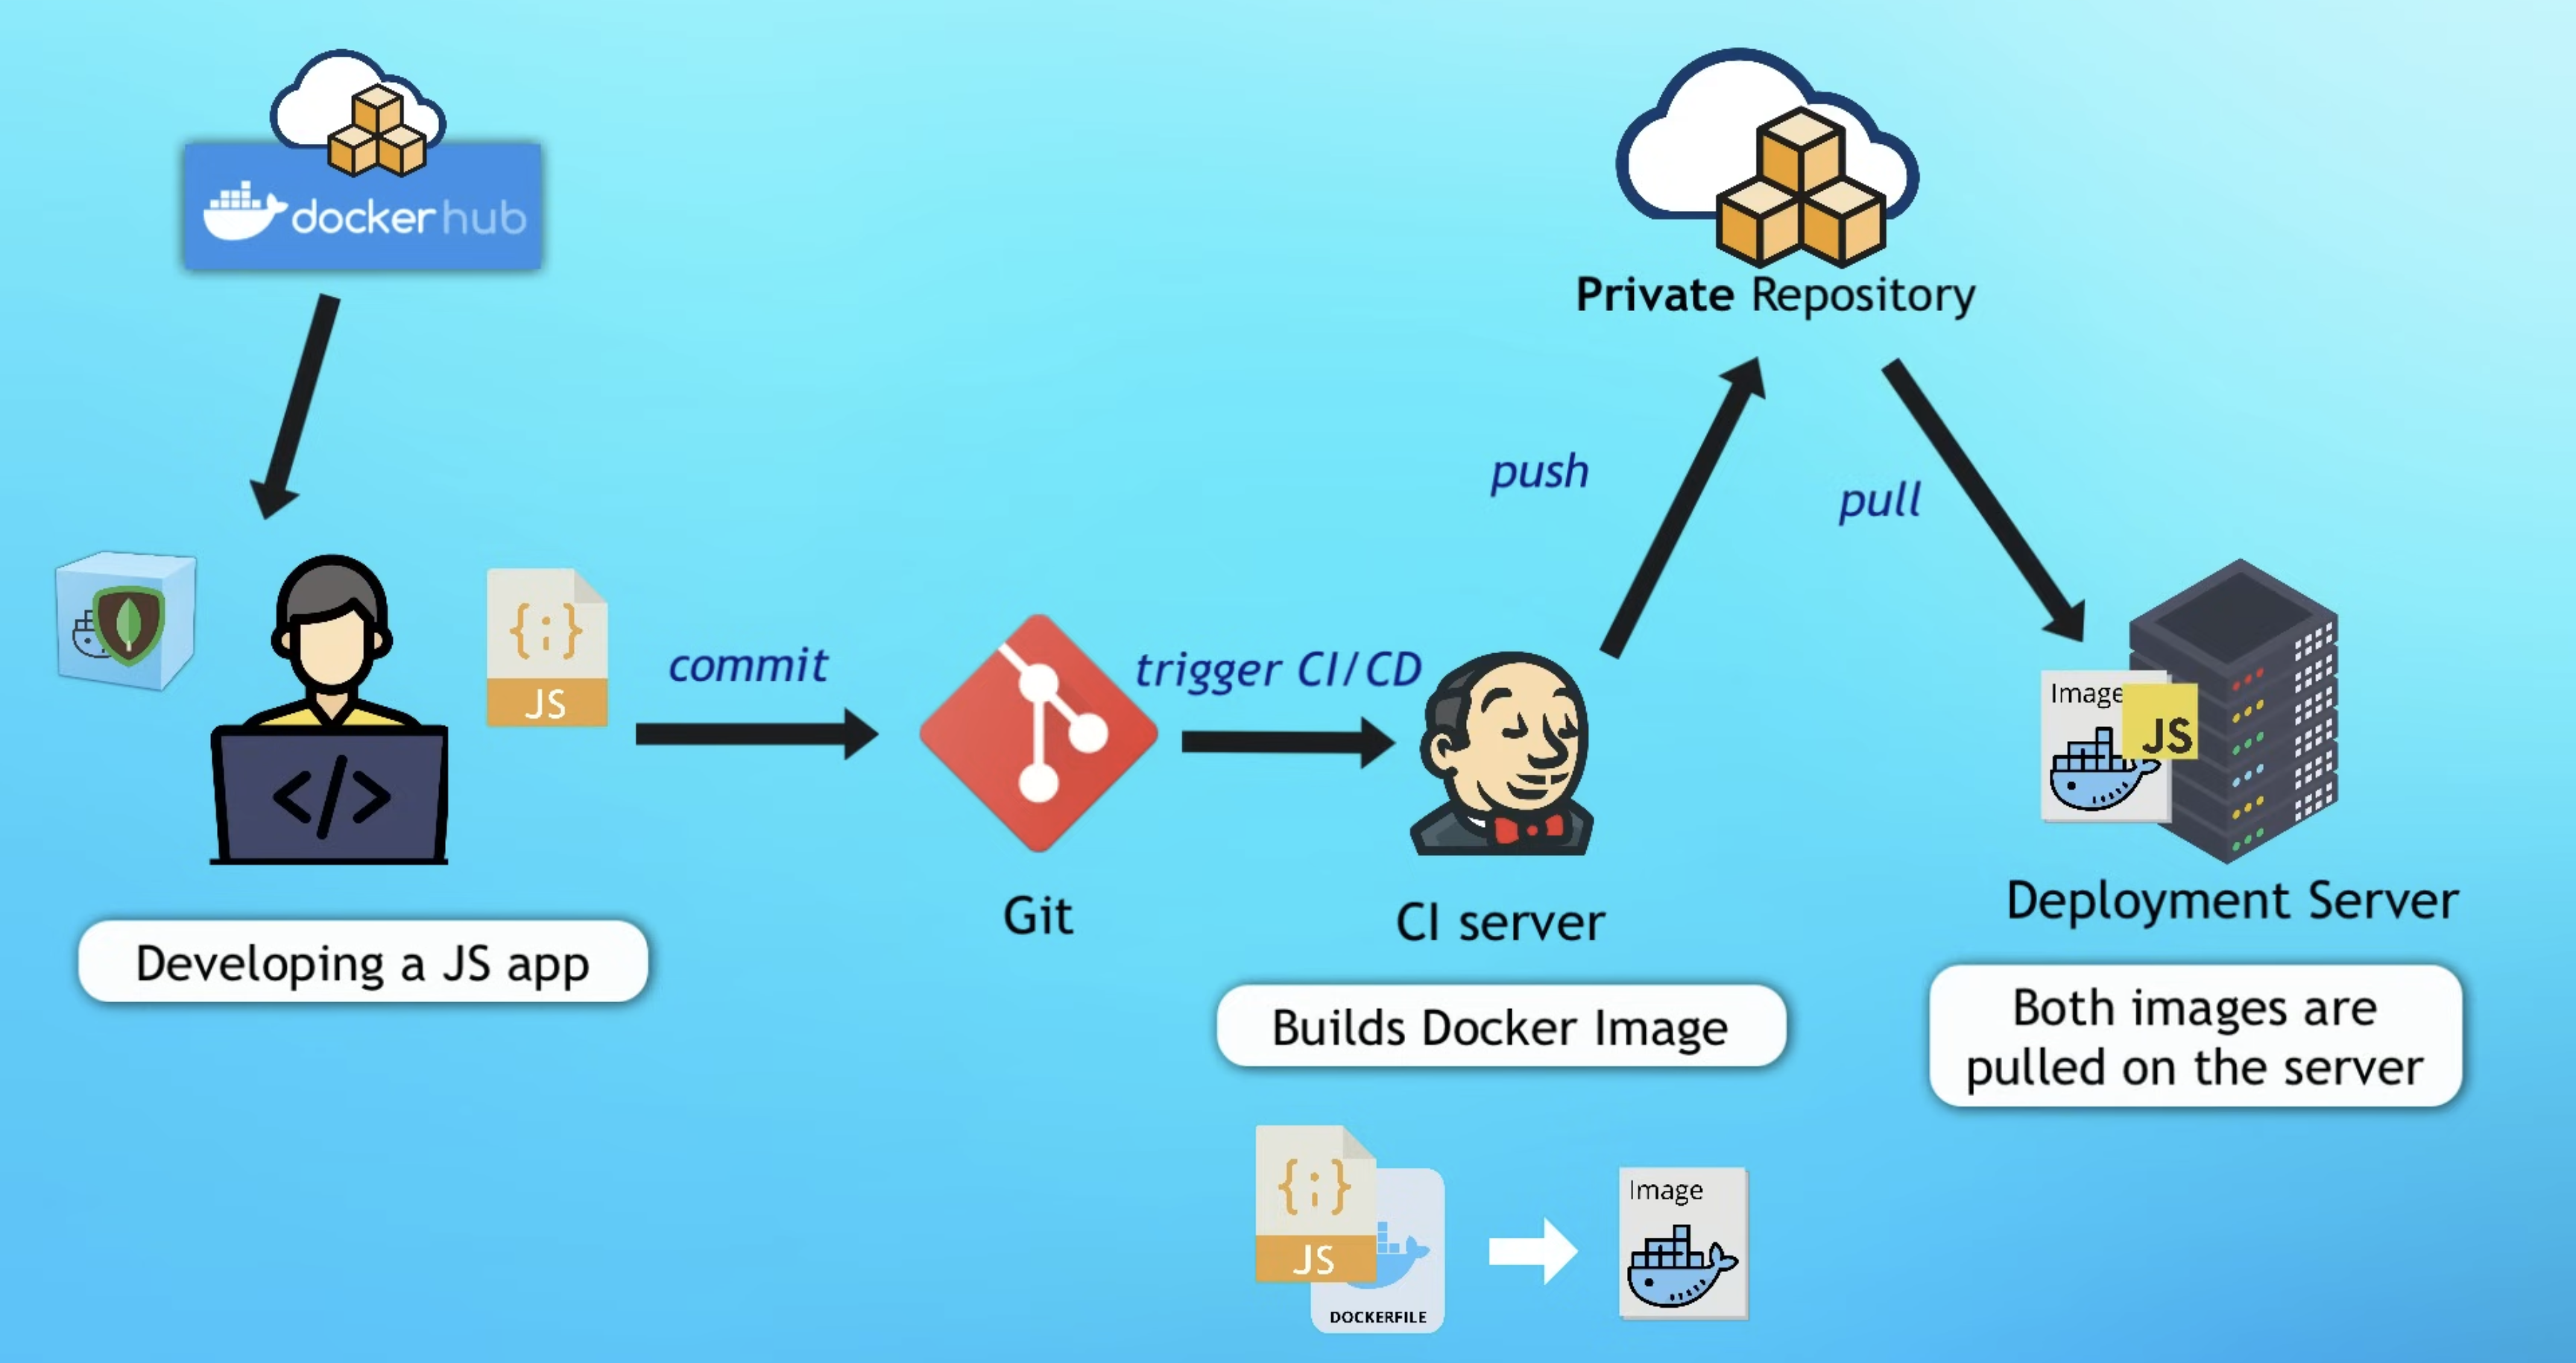
Key concepts at a glance (diagrams)
Big picture view of Docker in Software Development Cycle
Open in new tab (*Note: Best viewed in desktop or landscape view*)
Hands-on Lab 1: Run a container (nginx) and actually reach it
This mirrors the flow from the crash course: pull → run → port-bind → inspect logs.
Step 1 — Pull an image (optional, docker run can auto-pull)
docker pull nginx:1.23docker images
This downloads the image locally. At this point, nothing is running yet — you’ve only stored the artifact.
Step 2 — Run a container
docker run nginx:1.23
You’ll see logs because your terminal is “attached” to the container process.
Step 3 — Detached mode (get your terminal back)
docker run -d nginx:1.23docker ps
Step 4 — Port binding (make it reachable from your laptop)
Core idea:
Containers live behind Docker's networking boundary. Port-binding is you punching a controlled hole from host → container.
flowchart LR
  B[Browser] -->|localhost:9000| H[Host OS]
  H -->|publish 9000:80| D[Docker Engine]
  D -->|to container port 80| C{{nginx container}}
Bind host port 9000 to container port 80:
docker run -d -p 9000:80 nginx:1.23docker ps
Now open: http://localhost:9000
Why this works?
localhost is your host machine. The container’s port 80 is private unless you publish/bind it to a host port.
Step 5 — Logs, stop/start, and the “where did my container go?” moment
docker logs <container_id_or_name>docker stop <container_id_or_name>docker psdocker ps -a
docker ps shows running containers.
docker ps -a shows all containers (including stopped ones).
Restart an existing container (no new container is created):
docker start <container_id_or_name>
Step 6 — Name containers (humans > IDs)
docker run -d --name web-app -p 9000:80 nginx:1.23docker logs web-app
Hands-on Lab 2: Build our own image (my docker-demo workflow)
My demo repo is the canonical “smallest useful Dockerfile” exercise: a Node app with src/server.js and package.json, packaged into an image and run as a container (repo).
Think like Docker: what must be true for this app to run?
Requirements:
Runtime exists: node is available
Dependencies are installed: npm install happened during image build
Files are present: package.json and src/ are copied into the image
Working directory is consistent: pick a stable path (commonly /app)
Minimal Dockerfile (explained by “mapping local steps”)
FROM selects a base image that already has the runtime installed.
WORKDIR makes paths stable and predictable.
RUN executes at build-time (creates layers).
CMD is the default run-time command when the container starts.
Build-time (docker build) vs Run-time (docker run)
Everything in the Dockerfile except CMD executes during build — setting up the environment, copying files, installing dependencies. The result is an image (a frozen snapshot).
CMD is not executed during the build. It’s stored as metadata in the image — an instruction that says “when someone runs this image, start this process.” It only executes when you docker run.
This is also why you can override CMD at run-time:
# Uses the default CMD (node server.js)docker run docker-demo-app:1.0# Overrides CMD — drops you into a shell insteaddocker run -it docker-demo-app:1.0 sh
The image is the same in both cases — you’re just choosing a different process to start.
How COPY destination paths resolve (with WORKDIR /app)
Using . (relative) is cleaner — it avoids repeating /app/ and lets WORKDIR be the single source of truth for the path.
sequenceDiagram
  participant You as You
  participant Docker as Docker Engine
  participant Img as Image
  participant C as Container

  You->>Docker: docker build ...
  Docker->>Img: FROM/COPY/RUN (build layers)
  You->>Docker: docker run ...
  Docker->>C: create container from image
  Docker->>C: CMD (start process)
Shortcut:docker run will auto-pull from Docker Hub if the image isn't local. For your own image, it's local unless you push to a registry.
Stop it, remove it and delete it
# Stop an existing containerdocker stop docker-demo-rerun# Remove a stopped containerdocker rm docker-demo-rerun# Delete an imagedocker rmi docker-demo-app:1.0
Dockerfile intuition: layers and caching
Each FROM, COPY, RUN creates an image layer.
Docker caches layers. If a layer doesn't change, it reuses it.
Practical implication:
Copy package.json first, run npm install, then copy the rest — so dependency install is cached unless dependencies change.
Cache behavior in different scenarios
The Dockerfile from Lab 2 works, but its layer order isn’t cache-friendly (COPY src before RUN npm install means any source change also re-runs npm install). Here’s the optimized version — npm install is moved before COPY src so it only re-runs when package.json changes:
The optimization pattern: Place less frequently changing files (package.json) before expensive operations (npm install) before frequently changing files (src/). This ensures your expensive operations are cached unless their inputs actually change.
Volume: durable attachment you can remount to new containers
Bind Mounts (development workflow)
Rebuilding the image on every code change during development is slow. Bind mounts solve this by mapping a host directory directly into the container, bypassing the baked-in COPY.
# Mount your host's src/ into the container's /app/srcdocker run -p 3000:3000 -v $(pwd)/src:/app/src docker-demo-app:1.0
Now editing server.js on your machine is instantly visible inside the container — no rebuild needed. Pair with a file watcher (e.g., nodemon) for hot reload:
# Inside the container, instead of `node server.js`:npx nodemon server.js
When to rebuild vs. when to mount
Scenario
Approach
Code changes during dev
Bind mount + hot reload. No rebuild needed.
Dependency change (new npm package)
Rebuild needed — node_modules lives in the image.
Production / deployment
Always build a fresh image with everything baked in. No mounts.
The image is your snapshot for deployment. Bind mounts are your shortcut for development. You wouldn't ship a container that depends on mounting host files — that defeats the purpose of containerization.
Compose (why it exists)
docker run ... is great for 1 container. Real apps are usually multiple containers:
Think of Compose as "a declarative script for docker run commands" — the waiter coordinating multiple dishes (services), ports, and volumes on a single tray.
Where Docker fits in the bigger workflow (dev → CI → deploy)
The “big picture” loop:
Dev: run dependencies (DB/Redis/etc) as containers; keep your laptop clean.
Build/CI: build a versioned image from your app (docker build ...).
Registry: push to a private repo (docker push ...).
Deploy: servers pull the exact image version and run it (docker run ... or an orchestrator).
Net effect: you stop re-implementing "installation + configuration" as a fragile checklist on every machine; the image becomes the executable contract.
Best practices (high signal)
Pin versions: prefer postgres:16 over postgres:latest.
Name containers: it makes logs and scripts sane.
Prefer immutable builds: treat containers as disposable — never docker exec in to manually install packages or edit config files (those changes are lost on restart and invisible to others). Instead, configure via env vars (-e), volumes/bind mounts, or rebuild the image. You should be able to docker rm and docker run a fresh container with identical behavior.
All configuration should come from outside the container at runtime:
Environment variables (docker run -e DB_HOST=...) for config values
Volumes/bind mounts for data that needs to persist or vary per environment
The Dockerfile itself for any packages or dependencies (rebuild the image)
Don’t store secrets in images: inject via env/secret managers.
Clean up: stopped containers and unused images accumulate.
Environment drift: different versions, configs, OS behavior.
If an image is immutable, what is “running”?
A container is the running (or stopped) instance of an image.
Why do registries exist?
Distribution + caching + access control for large, versioned artifacts.
Why can’t I access a container port directly via localhost?
Container networking is isolated; you must publish/bind ports from host → container.
Why do we use CMD instead of RUN node ...?
RUN happens at build-time; CMD is the default runtime command.
If containers are disposable, where does persistent data go?
Volumes (or external managed services).
DockerFile (Python Application Template)
This template uses a multi-stage build to separate build dependencies from the final minimal runtime image.
# Stage 1: Builder (disposable workspace)FROM python:3.12-slim AS builderWORKDIR /usr/src/app# Create a virtual environment and activate it via PATHRUN python -m venv /opt/venvENV PATH="/opt/venv/bin:$PATH"# Copy and install dependencies into the venvCOPY requirements.txt ./RUN pip install --no-cache-dir -r requirements.txt# Copy source codeCOPY src ./src# Stage 2: Production imageFROM python:3.12-slimWORKDIR /usr/src/app# Copy the venv (all installed packages) and application code from the builder stageCOPY --from=builder /opt/venv /opt/venvCOPY --from=builder /usr/src/app /usr/src/app# Activate the venv via PATHENV PATH="/opt/venv/bin:$PATH"# Create a non-root user and switch to it for securityRUN useradd appuserUSER appuser# Expose (only documents) the port your app runs onEXPOSE 8080# Command to run the application (replace app.py with your main file) in exec form (instead of shell form)CMD ["python", "app.py"]
Stage 1: Builder
The builder stage is a temporary intermediate that Docker discards after the build completes.
Line
Purpose
FROM python:3.12-slim AS builder
Base image + names this stage “builder” so we can reference it later
WORKDIR /usr/src/app
Sets working directory (creates it if missing)
RUN python -m venv /opt/venv
Creates a virtual environment at a known, fixed path
ENV PATH="/opt/venv/bin:$PATH"
Ensures pip install targets the venv (not system site-packages)
COPY requirements.txt ./
Copy requirements from host → container
RUN pip install --no-cache-dir -r requirements.txt
Install deps into the venv without pip’s cache (smaller layer)
COPY src ./src
Copy source code
Stage 2: Production
Line
Purpose
FROM python:3.12-slim
Starts a brand new image — Stage 1 is discarded
WORKDIR /usr/src/app
Same directory (repeated because this is a fresh image)
COPY --from=builder /opt/venv /opt/venv
Copies the entire venv (all installed packages) from the builder stage
COPY --from=builder /usr/src/app /usr/src/app
Copies application source code from the builder stage
ENV PATH="/opt/venv/bin:$PATH"
Activates the venv so python resolves from it
RUN useradd appuser
Creates non-root user (security best practice)
USER appuser
Switches to that user for all subsequent commands
EXPOSE 8080
Documents which port the app uses (doesn’t actually publish it)
CMD ["python", "app.py"]
Default command when container starts
Understanding COPY --from=builder
The --from=builder flag means “copy from the stage named ‘builder’” rather than from the host machine. This copies the venv (containing all installed packages) and source code, but excludes any build artifacts, pip cache, or intermediate files that existed in Stage 1.
Why Use a Venv in Docker?
Without a venv, pip install puts packages into system site-packages (e.g. /usr/local/lib/python3.12/site-packages/). This is outside/usr/src/app, so a single COPY --from=builder /usr/src/app /usr/src/app would miss all your dependencies, causing ModuleNotFoundError at runtime.
A venv at /opt/venv bundles everything — packages, CLI scripts, and the Python binary link — into one self-contained directory that’s easy to copy in a single COPY instruction.
Why Multi-Stage Builds?
Stage 1 is a “dirty” build environment where you install build tools, download packages (which may leave cache files), and generate intermediate artifacts.
Stage 2 starts completely fresh and cherry-picks only what’s needed to run the app.
The key insight is the direction:
It’s not “start with everything, remove unwanted stuff”
It’s “start with nothing, copy only what’s needed”
This matters because you might not even know what junk got created during the build. By starting fresh, you automatically exclude:
pip/npm caches
Compiler toolchains (gcc, etc.)
Source files used only for compilation
Temporary build artifacts
Dev dependencies not needed at runtime
Result: Smaller image size + smaller attack surface (fewer tools for attackers to exploit if the container is compromised).
Attack Surface Explained
If an attacker compromises your running container (e.g., through an app vulnerability like SQL injection or RCE), they can only use tools already inside the container.
# None of these existcurl: command not foundwget: command not foundgcc: command not foundapt-get: command not found
The attacker is "trapped" with limited options. This is called defense in depth — even if one layer (the app) is breached, the next layer (minimal container) limits damage.
Two principles work together to reduce the attack surface:
Minimal features — Strip out build tools, package managers, and shells where possible. Less software means fewer vulnerabilities to exploit and fewer tools for an attacker to use post-compromise.
Limited permissions — Run as a non-root user, use read-only filesystems, and drop Linux capabilities. Even if an attacker gets in, they can’t do much.
The goal is to assume a breach will happen and make the container as useless as possible to the attacker when it does.
These layers stack — each one independently limits what an attacker can do, and together they compound. Breaking through one layer doesn't give you much because the next layer is waiting with its own restrictions. It's like a building with multiple locked doors — getting past one doesn't mean you're past all of them.
Can Base Images Be Compromised?
Yes. This is called a supply chain attack. Real examples:
Attack Vector
Description
Typosquatting
Malicious image named pytohn instead of python
Compromised maintainer
Attacker gains access to maintainer’s Docker Hub account
Dependency poisoning
Malicious package injected into requirements (not the image itself, but installed during build)
Registry compromise
The registry itself gets hacked
Mitigations for Supply Chain Attacks
Use official images — Look for the “Docker Official Image” badge on Docker Hub
Pin image digests (not just tags):
# Tag can be overwrittenFROM python:3.12-slim# Digest is immutable (SHA256 hash of exact image)FROM python:3.12-slim@sha256:abc123...
Tags are just labels — a maintainer can update what a tag points to at any time (e.g., python:3.12-slim could point to Image A today and Image B tomorrow). A compromised maintainer could push a malicious image under the same tag. Digests are content hashes — the SHA256 is computed from the actual image contents. If even a single byte changes, the hash is completely different. Nobody can overwrite it because the hash is the content. It’s like the difference between “download the file called report.pdf” (someone could swap it out) vs “download the file with checksum sha256:abc123...” (you’ll always get the exact same file, or the verification fails).
Scan images — Tools like Trivy, Snyk, or Docker Scout check for known vulnerabilities
Use private/verified registries — Companies often mirror trusted images to internal registries
Minimal base images — Alpine or distroless images have fewer packages = fewer potential vulnerabilities