Markdown formatting
Basic formatting Syntax
Paragraphs
If you want to prevent spaces from collapsing or add multiple blank spaces, you can use the (non-breaking space) or <br> (line break) HTML tags.
Footnotes
You can add footnotes1 to your notes using the following syntax:
This is a simple footnote[^1].

[^1]: This is the referenced text.
[^2]: Add 2 spaces at the start of each new line.
  This lets you write footnotes that span multiple lines.
[^note]: Named footnotes still appear as numbers, but can make it easier to identify and link references.
You can also inline footnotes in a sentence. Note that the caret goes outside the brackets.
You can also use inline footnotes. ^[This is an inline footnote.]
You can also use inline footnotes. ^[This is an inline footnote.]Note
Inline footnotes only work in reading view, not in Live Preview.
Comments
You can add comments by wrapping text with % by using it twice. Comments are only visible in Editing view.
Testing out a … (inline comment), which is hidden.
This is an  (inline) comment where the word inline is enclosed with % twice.

Below is a block comment, which is hidden in view mode.
Rendering images
Custom image size with caption and background color
<div style="text-align: center;">

<img src="Llama-pre-training-data-details.png" alt="Llama pre-training data details" style="max-width: 400px; height: auto; background-color: white; display: block; margin: 0 auto;">

<p style="font-size: 0.9em; color: #666; margin: 4px 0 0 0; font-style: italic;">Figure: Llama pre-training data details showing the composition and sources of training data used in the model</p>

</div>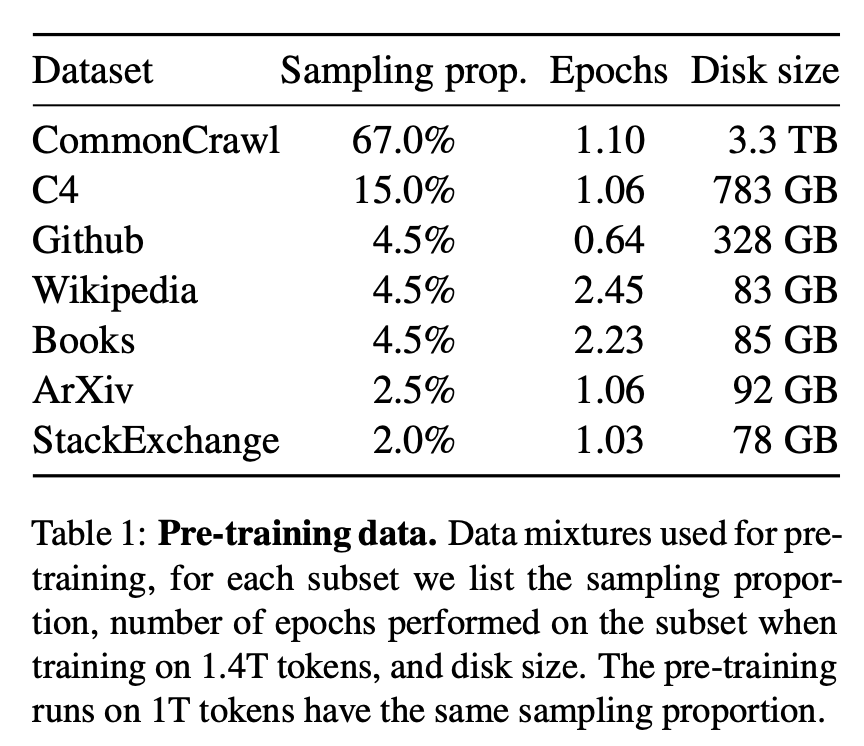
Figure: Llama pre-training data details showing the composition and sources of training data used in the model
Obsidian Flavored Markdown
| Syntax | Description | Example |
|---|---|---|
[[Link]] | Internal links | |
![[Link]] | Embed files | |
![[Link\#^id]] | Block references | |
^id | Defining a block | Obsidian Obsidian Glossary |
| “ | Comments | |
~~Text~~ | Strikethroughs | |
==Text== | Highlights | |
``` | Code blocks | |
- [ ] | Incomplete task | |
- [x] | Completed task | |
> [!note] | Callouts | |
| (see link) | Tables |
Callouts
Supported callout types
> [!note]> [!abstract]- Aliases:
summary,tldr
- Aliases:
> [!info]> [!todo]> [!tip]- Aliases:
hint,important
- Aliases:
> [!success]- Aliases:
check,done
- Aliases:
> [!question]- Aliases:
help,faq
- Aliases:
> [!warning]- Aliases:
caution,attention
- Aliases:
> [!failure]- Aliases:
fail,missing
- Aliases:
> [!danger]- Aliases:
error
- Aliases:
> [!bug]> [!example]> [!quote]- Aliases:
cite
- Aliases:
Nested callouts
> [!question] Can callouts be nested?
>
> > [!todo] Yes!, they can.
> > > [!example]  You can even use multiple layers of nesting.
Foldable callouts
 > [!note]- Foldable
 > This is a foldable callout
Plugins
- https://www.youtube.com/watch?v=7Rvl9Sl29Jk - Obsidian Smart Connections - Need to revisit this
- https://quartz.jzhao.xyz/plugins/ObsidianFlavoredMarkdown - Need to revisit this, and explore deeper for Block references
- LongForm - Helps to create long projects. Need to revisit this to understand its features properly
- canvas2document - Github
- Templated - Github
- Emoji Toolbar - Github
Extending Obsidian
CSS Snippets
- For more details, refer https://help.obsidian.md/Extending+Obsidian/CSS+snippets
table-wrap.css
/*
	Cribbed from the excellent ITS Theme
	https://github.com/SlRvb/Obsidian--ITS-Theme
*/
.cm-s-obsidian .HyperMD-table-row.HyperMD-table-row.HyperMD-table-row {
	white-space: pre-wrap;
	min-width: min-content;
	}
frozen-headers.css
/* Freeze table headers in Obsidian */
table {
    border-collapse: collapse;
    width: 100%;
}

thead {
    position: sticky;
    top: 0;
    background-color: var(--background-primary);
    z-index: 2; /* Ensure it stays above the content */
}

th {
    background-color: var(--background-secondary);
    color: var(--text-normal);
    text-align: left;
    padding: 8px;
}

td {
    padding: 8px;
    border: 1px solid var(--background-modifier-border);
}
mermaid-tweak.css
/*
Source(s):
    - https://stackoverflow.com/questions/78935770/how-to-set-rendered-mermaid-diagrams-width-to-be-based-on-screen-size-in-obsidia
    - https://forum.obsidian.md/t/resize-and-align-mermaid-diagrams/7019
    - https://www.reddit.com/r/ObsidianMD/comments/1crsgop/til_about_mermaid_diagrams/?rdt=50293
Date updated: 2024-02-14 (YYYY-MM-DD)
*/

/** Set Mermaid Diagrams to 100% width of screen by default */

.mermaid svg {
    display: block;
    width: 100%;
    margin: 0;
    padding: 0;
}

/** On hover, make the diagram full width and enable horizontal scrolling */

div:has(> .mermaid):hover {
    width: auto !important;
}

.mermaid:hover {
    overflow: scroll;
    padding: 0;
    margin: 0;
    text-align: left;
}

.mermaid:hover svg {
    display: block;
    width: auto;
    margin: 0;
    padding: 0;
}
customer.scss for Animated GIFs
@use "./base.scss";

// put your custom CSS here!

/* Animated emoji styles */
.animated-emoji {
  display: inline-block;
  vertical-align: middle;
  margin: 0;
  padding: 0;

  img {
    display: inline-block;
    vertical-align: middle;
    margin: 0;
    padding: 0;
  }
}
Example: Without custom css


Env setup
Quartz requires at least Node and npm to function correct. For more details, refer Get Started
Github repo setup
# Clone the repo locally
git clone https://github.com/prasanth-ntu/prasanth.io

# list all the repositories that are tracked
git remote -v

# if you don't have upstream as a remote, add it so updates work
git remote add upstream https://github.com/jackyzha0/quartz.git
Updating the Site
Key commands
- Building the quartz
- This will start a local web server to run our Quartz on our computer. We can view it at
http://localhost:8080/
- This will start a local web server to run our Quartz on our computer. We can view it at
npx quartz build --serveWhat actually happens during npx quartz build --serve
- Prebuild runs first (
sync-slideshow.sh+sync-html.sh) — copies slideshow and HTML files intoquartz/static/ - esbuild transpiles the Quartz config, plugins, and components into a single cached JS file (
quartz/.quartz-cache/transpiled-build.mjs) buildQuartz()runs — parses all markdown fromcontent/, filters out drafts, then emits output files topublic/using these emitter plugins:
| Emitter | What it produces |
|---|---|
AliasRedirects | Redirect pages for aliases defined in frontmatter |
ComponentResources | JS/CSS bundles for interactive components |
ContentPage | The actual HTML page for each markdown file |
FolderPage | Index pages for folders |
TagPage | Pages for each tag |
ContentIndex | RSS feed + sitemap |
Assets | Processed SCSS → CSS |
Static | Copies quartz/static/ to public/static/ |
NotFoundPage | The 404 page |
CustomOgImages | Open Graph preview images (.webp) for every page — the thumbnail shown when sharing links on social media, Slack, Discord, etc. This is the slowest emitter as it renders text onto images using satori + sharp for each page |
- Since
--serveis passed, it also:- Sets
--watchtotrue— auto-rebuilds when source files change - Starts an HTTP server on
localhost:8080serving files frompublic/ - Starts a WebSocket server for live reload (browser refreshes automatically on rebuild)
- Handles URL routing (e.g.
/foo/→/foo/index.html,/foo→/foo.html)
- Sets
With vs without
--serve
npx quartz build: Builds the site topublic/and exits. This is what GitHub Actions uses.npx quartz build --serve: Builds, starts a local server with live reload, and watches for changes. This is for local development.
- Sync the change to Github & Deploy
- Run this command every time we want to push updates to our repository.
npx quartz syncWhat actually happens during npx quartz sync
The sync command is not a build — it’s a git orchestration tool. The actual build happens on GitHub Actions after the push.
Local: npm run sync
The sync script in package.json is just npx quartz sync. npm automatically runs the prebuild script (bash sync-slideshow.sh && bash sync-html.sh) before any build/sync/serve script since it follows the pre<script> naming convention.
1. Prebuild (auto-triggered: bash sync-slideshow.sh && bash sync-html.sh)
- Generates Paige AI slideshow HTML files →
quartz/static/paige-slides/ - Copies architecture HTML files (Spark, Docker, K8s, etc.) →
quartz/static/pages/
2. npx quartz sync (defined in quartz/cli/handlers.js)
- Backs up
content/folder to.quartz-cache/content-cache - Commits all changes:
git add . && git commit -m "Quartz sync: <timestamp>" - Pulls from
origin v4(uses--autostash -X oursto keep local changes on conflicts) - Restores content from cache
- Pushes to
origin v4
GitHub Actions: Build & Deploy
The push to v4 triggers .github/workflows/deploy.yaml:
npm ci— clean install dependenciesnpm run build— npm auto-runsprebuildfirst, thennpx quartz build:- Prebuild: copies slideshow + HTML files into
quartz/static/ - Parses all
.mdfiles fromcontent/ - Filters out drafts
- Emits HTML/assets to
public/
- Prebuild: copies slideshow + HTML files into
- Uploads
public/as a GitHub Pages artifact - Deploys to GitHub Pages →
https://prasanth.io/
End-to-End Flow
Local                                GitHub Actions
─────                                ──────────────
npm run sync
  ├─ prebuild (slideshow + html)
  └─ npx quartz sync
       ├─ git commit
       ├─ git pull origin v4
       └─ git push origin v4 ──────→ deploy.yaml triggered
                                       ├─ npm ci
                                       ├─ npm run build
                                       │    ├─ prebuild (auto-triggered)
                                       │    └─ npx quartz build
                                       │         ├─ parse .md files
                                       │         ├─ filter drafts
                                       │         └─ emit → public/
                                       ├─ upload artifact
                                       └─ deploy to GitHub Pages
                                            └─ prasanth.io ✅
How prebuild works
The
prebuildscript inpackage.jsonuses npm’spre<script>convention — npm automatically runs it beforebuild,sync, orserve. This means:
- Locally: Prebuild runs before
serve/syncso slideshow and HTML pages render correctly during development- On CI: Prebuild runs before
buildbecause the GitHub runner starts from a freshgit cloneand needs to generate the static files from sourcePreviously,
build/serve/syncscripts also had an explicitnpm run prebuild &&prefix, causing prebuild to run twice. This was fixed by removing the redundant explicit calls.
Custom fix: Skip slugification for /static/ paths
Quartz’s link transformer (quartz/plugins/transformers/links.ts) processes all internal <a href> and <iframe src> URLs through transformLink() → slugifyFilePath(), which converts spaces to hyphens and strips .html extensions. This is correct for content links (e.g. [[My Note]] → My-Note), but breaks paths pointing to actual static files.
The problem: An iframe like <iframe src="/static/pages/Spark%20Architecture.html"> gets slugified to /static/pages/Spark-Architecture (no extension, hyphens instead of spaces), causing 404s since the real file on disk is Spark Architecture.html.
The fix: Added guards to skip transformLink() for any path starting with /static/:
// For <a href> tags (line ~102):
const isInternal = !(
  isAbsoluteUrl(dest, { httpOnly: false }) ||
  dest.startsWith("#") ||
  dest.startsWith("/static/")  // ← added
)

// For <iframe src>, <img src>, etc. (line ~150):
if (
  !isAbsoluteUrl(node.properties.src, { httpOnly: false }) &&
  !node.properties.src.startsWith("/static/")  // ← added
) {
Why this is safe: /static/ contains files served as-is (HTML pages, images, fonts) — not Quartz content. Skipping slugification means these paths won’t appear in the link graph or get popover previews, which is correct since they’re not content pages.
- Upgrading Quartz
- To fetch the latest Quartz updates, simply run
npx quartz updateFor more details, refer Quartz 4.0 official documentation
Customising the site
- Open Graph Meta Tags
- Preview and generate using this site: https://www.opengraph.xyz/url/https%3A%2F%2Fprasanth.io
- Line wrap in source mode of when editing table entry
- Solution provided in Obsidian forum
ContentMeta.tsx
interface ContentMetaOptions {
  ...
  showAuthor: boolean
}

const defaultOptions: ContentMetaOptions = {
  ...
  showAuthor: true,
}

export default ((opts?: Partial<ContentMetaOptions>) => {
  ...

  function ContentMetadata({ cfg, fileData, displayClass }: QuartzComponentProps) {
      ...

      // Display author if enabled and available
      if (options.showAuthor && fileData.frontmatter?.author) {
        segments.push(<span>Book by {fileData.frontmatter.author}</span>)
      }
Obsidian References
Site Inspirations
- https://notes.yxy.ninja/ - NUS CS student
- https://yomaru.dev/projects
- https://www.rcook.net/How-I-use-Obsidian,-Quartz,-Git-and-Apache-to-publish-these-notes
- https://wfhbrian.com/obsidian/introducing-smart-chat-transform-your-obsidian-notes-into-interactive-ai-powered-conversations#limitations-and-tips-for-a-better-experience
- https://oliverfalvai.com/Personal-changelog
- https://tfthacker.com/article-obsidian-dashboardplusplus2022
- https://hermitage.utsob.me/
- https://collapsedwave.com/Machine-Learning/Autodiff
- https://jzhao.xyz/posts/2021
Tutorials & Youtube Videos
- How to publish your notes for free with Quartz
- The youtube video that I referred to publish my Obsidian notes using Quartz plugin and Github Pages for 🆓
- “Obsidian” Canvas on STEROIDS: Excalidraw 1.9.5 release
Documentations
- Quartz 4.0
- The documentation I referred to publish my Obsidian notes for free with Quarts
Non-obsidian Site Inspirations
Footnotes
-
This is the referenced text. ↩